

Let me tell you a funny story. My husband loves me dearly and supports me in every way. He is, after all, Mr. Almost Perfect! He is also an engineer and has admitted that he does not “get” art. He’s happy I do it but it has yet to touch his soul. The first time I showed him one of my small textile works in a frame his exact words were, “Wow! That looks like ART!” I had to take more than one very deep breaths thinking, “What did it look like before?” As soon as my head cleared I had something of an epiphany… or at least a “duh” moment. Most people have no real life experience with textile art. If they see a fancy little bit of fabric they might only have grandma’s potholders to relate it to. Framing your small textile works presents them in a format that is immediately understood by everyone as ART!
 Over the next week I’m going to show you a few of the ways to present your smaller textile art pieces. First up is mounting your work on gallery wrapped canvas. Begin with a small, finished textile piece. In this case it’s an abstract piece, fused and stitched to timtex with a satin stitched edge.

Gallery wrapped canvases are fairly inexpensive – especially when you use your half off coupon at your local craft store. I like to use the deeper canvases, usually 1 3/4 inches or so. Choose a size that is several inches bigger than your textile work all around – it’s especially good if the wooden frame on the back isn’t overlapping your artwork. You’ll see why in a minute. I paint my canvas to accent the artwork, in essence turning it into an integral part of the overall design of the piece. In this case I played with layers of paint, sometimes sponging them off with a wet paper towel before they were all the way dry. When the piece was fully mounted I went back in with india ink and doodled a continuation of the black stitched motif. I love to bleed my textile work out onto the canvas.
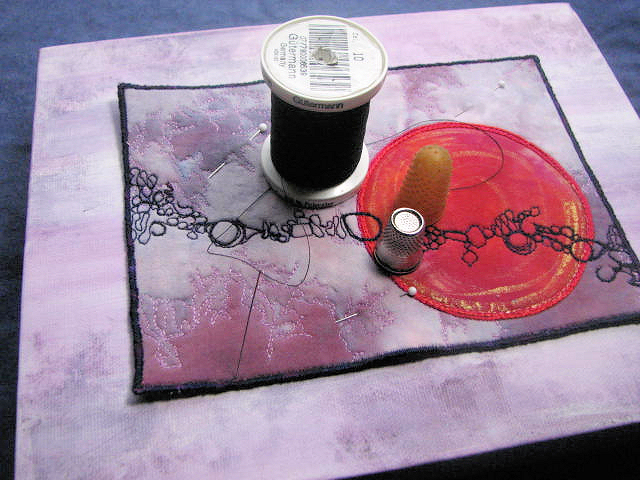
Place your work on the painted canvas and pin it in at least three, preferably four spots so it won’t move around while you sew it down. I chose thread the same color as the satin stitching on this piece so that I can just sew right through the edge. If your piece is faced or does not have an edge treatment that you can sew through, you just carefully catch the back edge with each stitch you take. A little tricky but not impossible! I use a thin but fairly sturdy needle and use a thimble on my “underneath” finger and a secretary’s rubber finger on my “topside” pointer finger to help pull the needle through. Painted canvas can be tough but these two tools will help a lot!
 Make sure you knot the thread well. See how close the stitching is to the wooden frame? I learned the hard way to make sure that frame isn’t right under where I need to stitch. Again – you CAN angle your needle under that frame but it’s a royal pain in the rear!
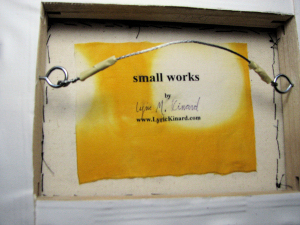
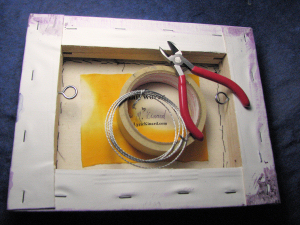 I fuse a label or use a sharpie to create one on the back of the canvas. Sometimes I’ll subtly sign one of the sides of the canvas as well but on works of this size I rarely sign the front. I feel the signature competes with the composition. You do it whichever way you feel best but always, always, ALWAYS sign and date your work – somewhere. Now I screw in the eyes and wire the work for hanging. I like to wrap the ends of that wire with a little bit of tape. The ends of picture hanging wire make for nasty little scratches and cuts when you handle it.
If you enjoyed this tutorial I know you will love my online course:

UPGRADE YOUR ART by learning a variety of professional presentation options for textiles. Award winning artists, Lyric Kinard shows you mounting and framing options. Learn which factors to consider to present your work in the best possible light.
All of these video based lessons will be yours to access permanently in this open-access course. Lesson one opens June 19th in this premier run of the course, with one lesson opening each week afterwards. After that – all lessons will be available immediately for new registrants.
registration is open now
$29.99
Here are a few of my recent works that utilize this technique.
 GLORY
GLORY
Click this link to see how this series was created. In this case the leaves were simply glued onto the canvases with gel medium.
 FAMILY TIES
When I mounted most of the pieces in this series I did need to sew them onto the canvas by catching just the back edge. I also chose not to paint the canvases. I did texture them with modeling paste. I pressed lace into the damp paste to get an imprint then when it was dry I used a white acrylic paint over the whole thing. Isn’t it cool how you can take a bunch of tiny pieces and turn them into one bigger work with PRESENCE through this mounting technique? You can see details of each piece in the series by clicking here.
 SOAR II
This mounting technique works just as well for larger pieces as smaller ones. Works II through IV in the Soar Series are mounted on 20×20 canvases.


9 Comments
Sandy S
February 8, 2015 at 10:59 pmThank you! I was looking for some creative ideas for signing and dating the back of some small art pieces that are in frames. Your picture with printed/dyed fabric was very helpful! The rest of your article and newsletters etc. are very inspiring! Keep it coming!
Greenman Project | autumndawns.com
March 30, 2014 at 8:27 pm[…] Since I like to make decisions as I go along, I’m not sure how it will be finished. One idea is to attach it to a canvas, a la Lyric Kinard. […]
tess
February 5, 2014 at 11:23 amhello
Just one quick note on the tutorial. Please do not write with sharpie on any part of the canvas behind the art work. Be careful to write where the canvas is backed by the wood frame. The reason I state this is that sharpies do bleed through the canvas and paint over time. I have a beautiful painting that an artist signed on the back of the canvas with sharpie and guess what… the signature is bleeding through all those layers to be seen on the front. Just because a product says “permanent” does not mean it will not bleed through mixed media works. I hope this comment can save others from future grief. Tess
PB
November 25, 2013 at 5:20 pmThanks for sharing this. What a great idea to mount on canvas to display.
Thanks again!
Holly McLean
November 25, 2013 at 7:35 amThank you for this great tutorial! I currently have mounted one piece but would like to do more.
I went to look at your Family Ties series. I love all the textures! Beautiful!
Sharon Matthiesen
November 20, 2013 at 5:32 pmLove the family ties. I have many of my mother’s and grandmother’s lace hankies and other bits and pieces. I wonder if the greats and great great’s would like something framed.
Thanks for the ideas.
Mia
November 20, 2013 at 11:50 amThank you for sharing this information. I’m starting to mount smaller pieces of my fiber art. Do you date your artwork?
Carol Leitch
November 19, 2013 at 6:37 pmBrilliant and beautiful work
Lynette (NZ)
November 19, 2013 at 6:00 pmLove these – thanks so much for the tutorial
Notice: Undefined variable: consent in /home/lyricki/public_html/wp-content/themes/hawthorn/comments.php on line 49