
I thought I’d share this tutorial with you again since it goes along with the last post. this isn’t the same instructions that are in the book but it does involve gadget cases.
Isn’t it funny how quickly tech gadgets are outdated!? I sent in these little cases for Quilting Arts Magazine for the “Glam-To-Go for Gadgets” article. They didn’t use the case I actually spent the most time making – no worries. It’s perfect for showing you one of my favorite techniques to play with – beaded fringes!

Materials:
- Something to add fringe to: gadget case, scarf, your husbands favorite necktie. In any case it will need to have enough “oomph” to support the fringe. In this instance, the fringe will be supported by the satin stitched bottom edge of the case. For a scarf I like to add a tiny bit of cording or seam tape or ribbon (depending on the weight of the scarf) inside of a rolled hem.
- Beading thread (I love Nymo) and a beading needle (or a size 11 applique needle.)
- Seed beads and other larger beads. Make sure the holes in the larger beads are not so big that the seed beads sink into them. If they are you’ll need to put medium beads next to the large holed beads.
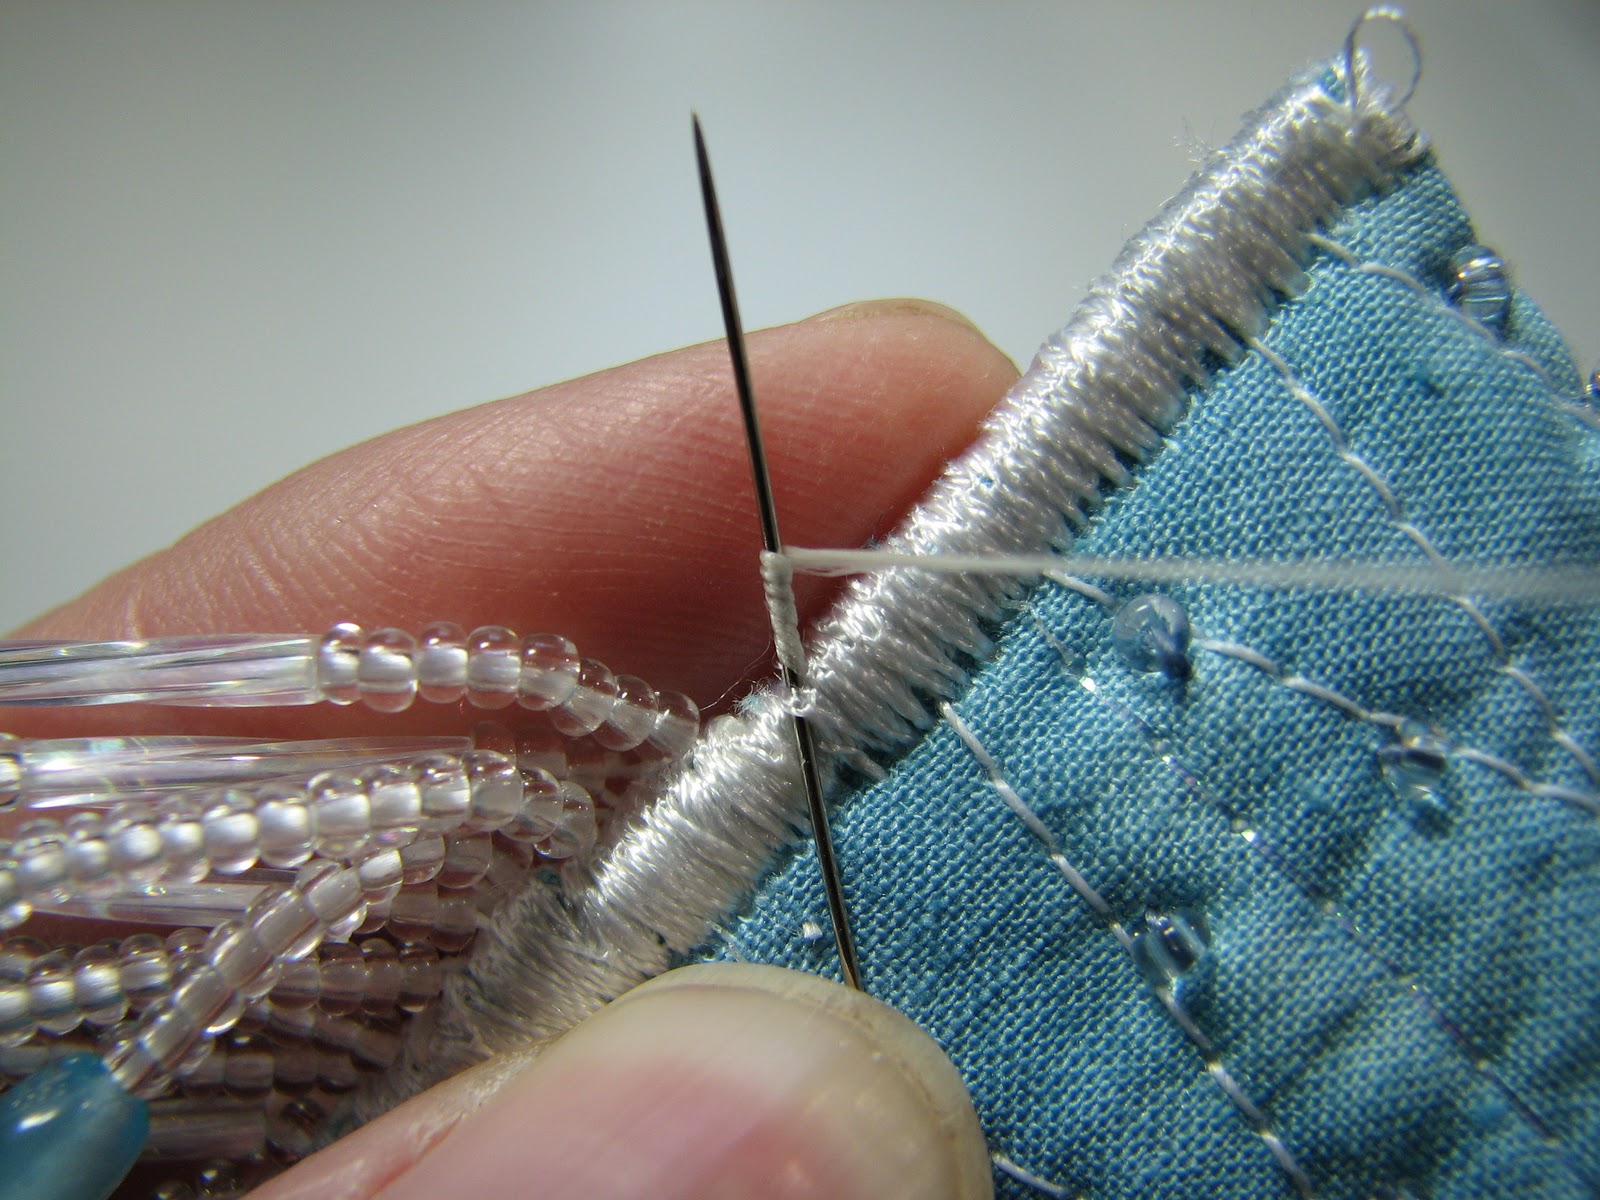
1 – Make your knot. Thread your needle, bring it in through the case and out on the edge of the satin stitching. Leave the tail of the thread hanging out. Wrap the thread (not the tail end) three times around the tip of the needle, hold the wrap with your thumb and pull the needle through. You should have a secure knot now. I often make at least one more knot in close to the same place just to be extra secure.
2 – Load your beads onto the needle. Add seed beads until your fringe is about as long as you wish it to be then add your bigger bead and one more seed bead. The seed bead on the end is your anchor. Slide all of the beads to the end of the thread.
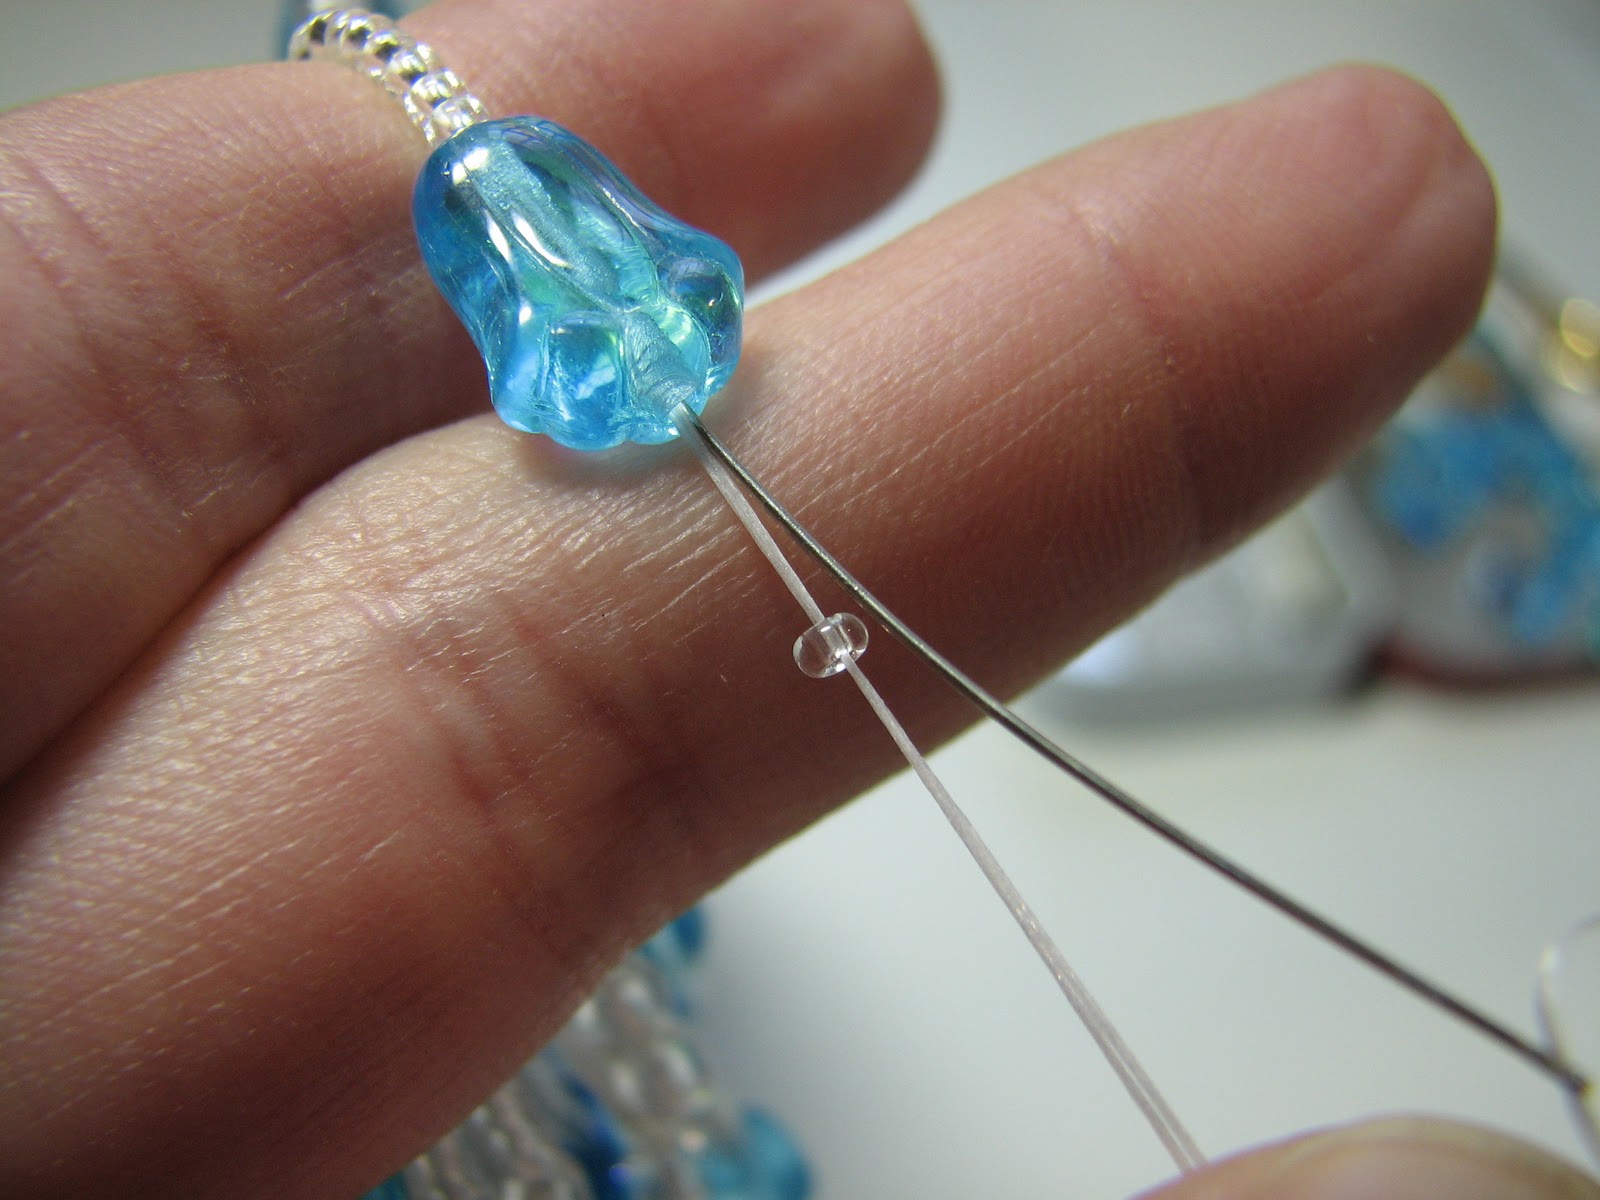
3 – Anchor your fringe. This is the only tricky part – and it really isn’t hard. Slide that last seed bead away from the line of beads then send your needle right back through your whole line of beads. I find it easiest to do if I bend the line of beads over my finger, holding the thread taut. This lines up the beads in a row and holds the thread tight along the bottom of each hole. That way you have room to get the needle back up through the whole line.

4 – You might not be able to get the needle all the way through your line of beads in one shot. No worries. Just do it a bit at a time, holding that thread taught to it easier to slide the needle through.
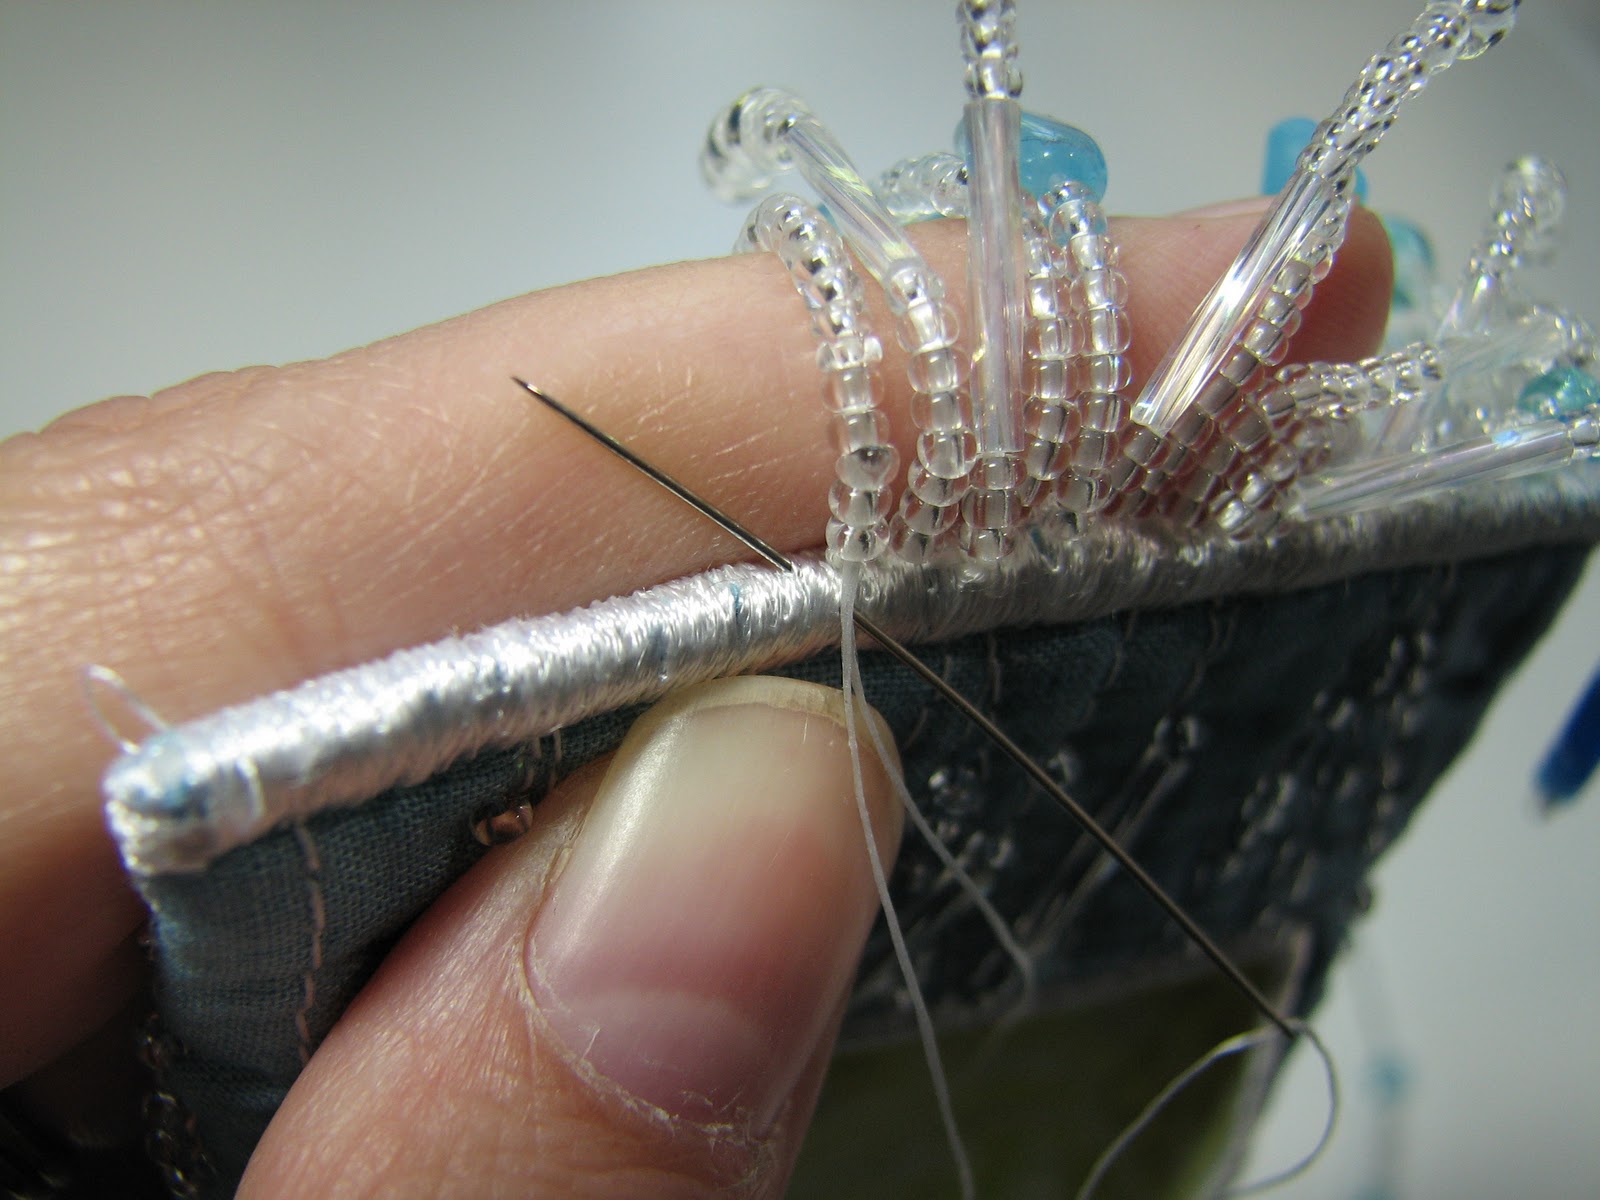
5 – Push your needle into the satin stitching, right under your fringe and come out where you want the next fringe to start. Continue adding fringe until you think you’re done. Notice here that my fringe isn’t the same – I like it funky. Sometimes my big bead is in the middle, sometimes there are more seed beads on the end than just one anchor. Mix it up and make it fun. (And yes, I am an artist and my cuticles and nails ALWAYS look that bad!)

6 – Make a knot right next to the last fringe in the same way you did at the beginning. In fact, make two knots. Come to think of it, make a knot and just keep going (not starting with a new thread each time) every three or four fringes just to be safe. I truly dislike the sound of a million tiny beads scattering across the floor as my child yanks on my fringes. At the end, after your last knot, send your needle up through the satin stitching and come out anywhere. Trim the tail off and you’re done.
Hope you enjoyed it! Go add some beady fringe to something! They make wonderful swishing noises as they move and swing around. If DVD’s are easier for you to learn with you can find this and a lot more on my instructional DVD:
Bead It Like You Mean It!
 And now for a little surprise.
 Anybody want it? Anybody out there still use an ipod classic? My daughter has my old one but isn’t interested in this case.

You could get creative and fill in the holes with beaded cloth of your own. Who knows.
Leave a comment here telling me what you would do with this lovely little beaded thing.
This giveaway IS open to International readers – I’ll draw the winner next Monday. (tell your friends to stop by and leave a comment too!)
Congratulations! go to Manuella – the winner of Ann Fahl’s Applique booklet. She says “I love Ann as an artist and admire her work. I am on a learning journey and haven’t found my favorite technique till now. I am open to every new techique to learn and would be very happy about this book.”


17 Comments
Tunic Blog
September 14, 2016 at 10:36 amA Perfectly Placed Beaded Fringe
[…] or my ipod, I still use my orig one while in the studio. I like your tutorial, I […]
Giveaway: The Sketchbook Project Journal | Lyric Art
May 22, 2013 at 6:31 pm[…] of the Travel Accessories by Craft Tree booklet and to Kath who actually HAS an ipod to go into the ipod case that I’ll send off soon! I really do love it when little lovelies find a happy […]
Jackie
May 20, 2013 at 1:43 pmI would give it to my nephew and future niece-in-law fir their best man for carrying the wedding bands.
Joaniez
May 17, 2013 at 3:39 amI love the beaded trim. I think beads on quilts look fantastic. I think I will try to do some beading. Thanks for the inspiration.
Deb
May 17, 2013 at 1:40 amI love the dangling beads on the case. I think beading is relaxing. I just got my first iphone. will it fit that?
Laura
May 17, 2013 at 1:03 amSince I don’t have an i-pod, I’d use it as wearable jewellry as well. The bead fringe would be lovely to fiddle with while wearing. I might even add more embellishment ! What a fun and generous give-a-way.
Debbie M
May 16, 2013 at 12:22 pmMy son has an ipod classic. He’s looking to buy something new, so maybe he’ll give it to me!
Cindy MacPhee
May 16, 2013 at 2:49 amI think it would be a really cute piece of wearable art…..I might loop it through a belt loop and let the beads dangle or even around my neck as an interesting necklace.
Thanks for the tutorial too! <3
Heidi
May 15, 2013 at 11:00 pmI would love to play with the fringe- I’m a very tactile person. I can see flowers added to the circle cutout and a bird for the rectangle. Add a closure and I’d have a perfectly beautiful holder for a bit of cash and my debit card! Thanks for offering this beautiful creation of yours 🙂
Lind
May 15, 2013 at 3:51 pmWould love to have this beautiful work so that I could tuck “emergency” money into it and give it to my lovely granddaughter as graduates high school and heads off to live at university.
Jayna
May 15, 2013 at 3:11 pmYour case would go to my daughter, Amy. She would love it! It could become quite the traveler as she is the adventurous one.
Helen
May 15, 2013 at 1:51 pmThanks for the tut and I’d love to have that little bag.
debi kibbee
May 15, 2013 at 1:46 pmI would use the case for my ipod, I still use my orig one while in the studio. I like your tutorial, I am going to have to try doing a little beading.
Carole Frocillo
May 15, 2013 at 1:42 pmI have never used an IPod! My daughter keeps encouraging me to work when listening to music. Her last conversation about it was last night; and today, there is your wonderful case. I think it is a message that I need to modernize myself! I hope I win.
Love the tutorials. I am such a visual learner.
Carole
Regina B Dunn
May 15, 2013 at 12:48 pmI have an iPod Classic and I would use this in my new studio where it would look fantastic! Thanks for the opportunity.
Kath
May 15, 2013 at 9:39 amWell, I would use it for my iPod of course 🙂
I did make myself a little case to carry it but didn’t have your brilliant idea of leaving the holes so it can be used whilst still in the case!
Loved your tutorial for an easy book cover, very useful.
Kath
Jeannie
May 15, 2013 at 6:22 amI love your dvd. I never really added beads to things especially quilted items until I watched your dvd. Thanks! Your Surface Design dvd is still one of my favorites and then there is your book. I use it as a jump start when I am in a funk. 🙂 I don’t own an Ipod, but I think it would be fun to add some fabric in the open areas and make one of Melly’s sew-plies purses out of it. Thanks for the tutorial.
Notice: Undefined variable: consent in /home/lyricki/public_html/wp-content/themes/hawthorn/comments.php on line 49