

I love doodling in my sketchbook. This sketchbook is definitely not a work of art – it’s my WORK place. Most of what’s in there is an ugly mess and I don’t care. But some of the doodles have potential as thermofax screens.
This one for instance.
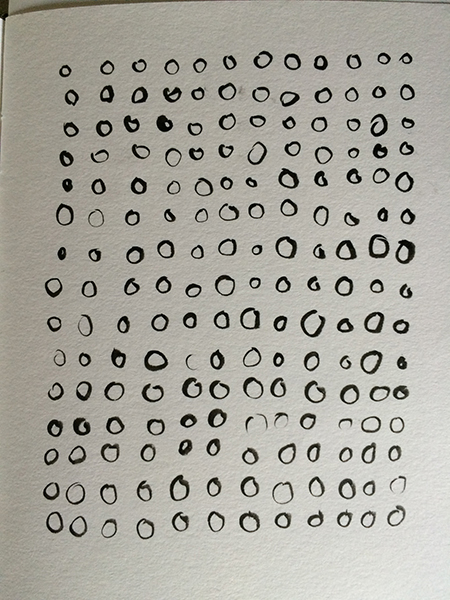
Picture taken with iPhone while doodle was still in sketchbook.
Now if I wanted to turn this into a great screen it would need some work. I need a stark black and white digital image so that I can print it out on my laser printer that uses the right carbon based toner that will burn through the emulsion on the fabric mesh when I run it through my thermofax machine.
See how the page is shadowed at one corner and brighter at another corner? That’s not going to work.
It is also hard to keep the image from key-stoning when you take a photo with your phone or camera. See how the image is distorted in the upper left corner? It leans in and isn’t square? The sketch itself isn’t that way – just the photo.
How to fix that?
SCAN YOUR IMAGE

Scan of doodle cut out of sketchbook so it will lay flat.
You can see the difference in this image where the lighting is perfectly even and the photo is square. When you scan your image please pay attention to the following.
RESOLUTION: scan at 300 dpi because you are concerned with print quality – not screen quality. 72 is standard for an image that you look at on your screen but is not high enough for a clear crisp print.
FILE TYPE: JPG will be the easiest to work with in a digital editing project. If your piece needs no cropping and is already in black and white a PDF might do as well.
COMPRESSION: when you scan your image, then save it, make sure that you do not compress the file further. At some point when you go to save you will see a quality slider similar to the one below. Make sure you drag the slider all the way to 12 – which is the maximum quality.

Now – make a copy or duplicate of your image and lets get busy. You always do that right? That way if you make a mess of things (I often do) you can start back with your original file.
CONVERT IMAGE TO BLACK AND WHITE
No shades of grey. No creme paper. No shadows. When the thermofax machine burns through the emulsion coating the fabric screen the grey areas of the screen may or may not burn all the way through. The best way to have a clean image for your print is to have a clearly black and white image to send to me. If you are starting with a lower quality photo such as the first one in this post, I’ll show you how to clean it up.
These instructions will work with pretty much any digital editing program. I’ve used Photoshop Elements, Photoshop, Paint Shop Pro, and Gimp as well as a few others. If you can’t find the tools I mention in exactly the same place just open your program and type the tool name in the HELP box at the top. Most of the programs will give you an arrow pointing to where that tool is located.
BRIGHTNESS/CONTRAST
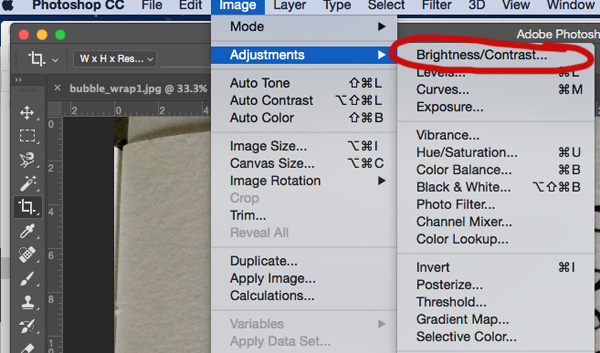 Find wherever your programs Brightness/Contrast controls are hiding and give it a click. Up will pop a window with two sliders.
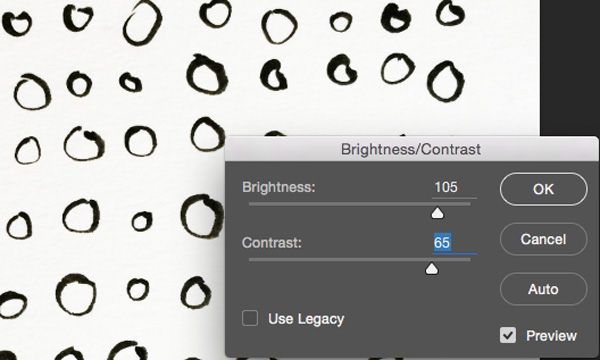 Play around with the sliders until you can see that the image is as bright white and dark black as you can get it without losing parts of your image.
LEVELS
 I also often play around with Levels instead of brightness/contrast. This is the most complex of the three methods but it isn’t a big deal. Remember that control+Z is your best friend. It is the UNDO button.
 There are three sliders in the levels window to play with. I’m certainly not a photoshop expert so I’m not sure I can explain to you why these work or how – but they do. First I mess with the slider on the right under that funky mountain graph looking thingy. It usually makes the white background whiter as I move it to the left. Next I work with the middle slider. This one is more fiddly – I move it back and forth until I’m happy with how black my blacks are. Sometimes I mess with the far left slider but not often.
Again – just play around as see what you get.
THRESHOLD
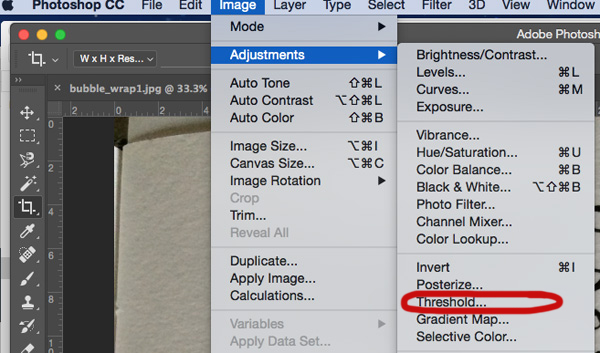 The last and sometimes quickest tool to use is the Threshold filter. It’s also the tool that is hidden in different places in every digital editing program so you might need to type it into the Help bar to find it.
It’s quick and easy but it isn’t always the best at keeping all the details you want. Let me show you.
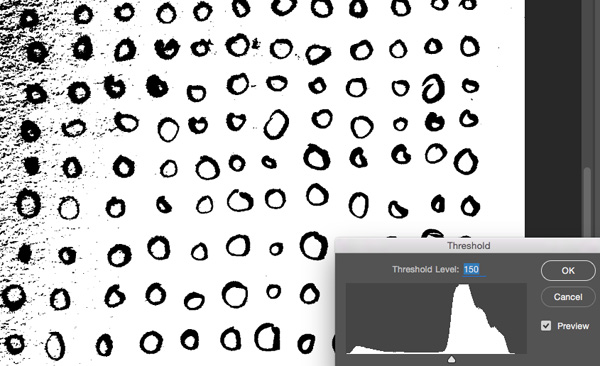 There is only one slider to play with and you get ALL black and white immediately. You need to slide the little pointy button back and forth though. I really didn’t want all that shadowing on the upper right to show up.
 So slide that slidy slider around and see what happens. In this case – moving it around too far got rid of the shadows but lost some of the lighter circles in a different part of the doodle. Again – play until you are happy with what you have.
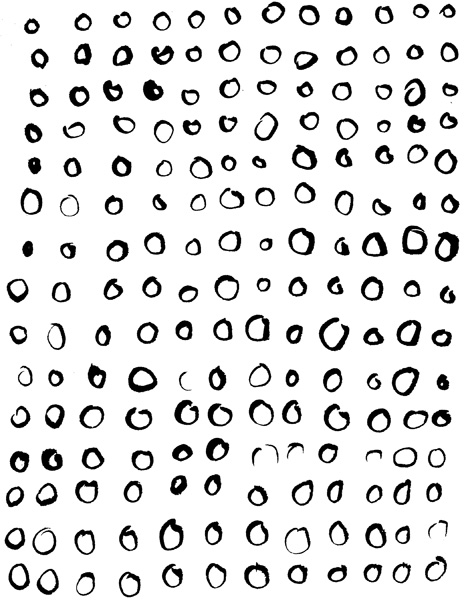 Here is a middling image that doesn’t have any messy bits and has enough of the circles intact to make me happy. What do you think?
VOILA!!!
Now you have a stark black and white image.
Remember – there is no rule saying that you can’t try all three in conjunction. Sometimes I boost the Brightness/Contrast then go straight to the Threshold filter.
Now – it might be the case that you see some messy flecks and dots that are bugging you. Anything on that page (I recommend you print out your image so you can see what you are going to get in the finished screen) is going to show up.
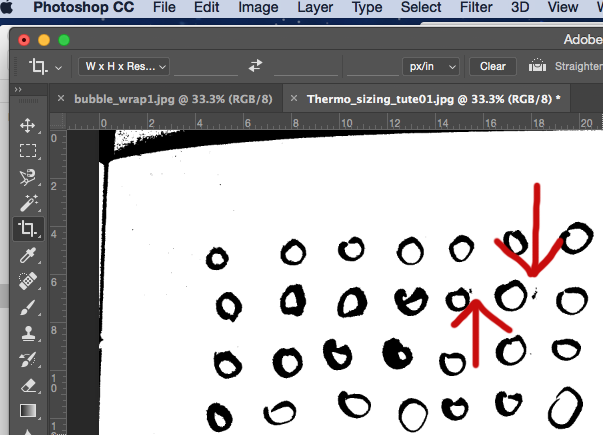
We can fix that.
Hunt around for your eraser tool. Remember that HELP box up at the top of your control menu can find it for you.

You will need to size your eraser, and decide the “hardness” of the tool.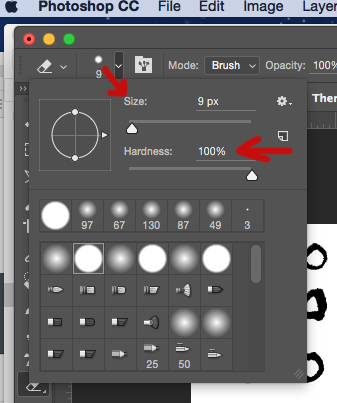
I needed my eraser to be small enough not to erase any of my circles so it was set quite small on this file. Remember that if you accidentally erase something you wanted to keep you can click control (or command) Z – or Edit/Undo to, well, undo what you just did.
Hardness controls whether the edges of your eraser are hard or a little fuzzy. With a black and white image I like a hard edge.
Click and slide and work your image until you’ve erased all the flecks and specks and you like what you’ve got.
Good?
GOOD!
I strongly recommend you also check out my tutorial on SIZING so that when you send your image to me to be made into a thermofax screen you get exactly what you want.
HAPPY PRINTING!


4 Comments
Jan
February 26, 2019 at 7:51 pmI was wond3ring if text needed to be reversed when it is sent to you?
Lyric Kinard
February 26, 2019 at 9:50 pmNo need to reverse your words or designs. Good question, thanks for asking.
Mary Ann
September 30, 2016 at 7:32 pmWhat is the screen mesh size used for thermofax used for printing fabric? Is
70 mesh too coarse?
Lyric Art — tutorial: sizing images for thermofax screens
September 26, 2016 at 7:05 am[…] keystoning, see how the image is distorted as it is in the upper left corner you see here. See THIS TUTORIAL for working with the image to make it thermofax-ready. This image is NOT ready because it is not a […]
Notice: Undefined variable: consent in /home/lyricki/public_html/wp-content/themes/hawthorn/comments.php on line 49