

If you are unsure of how to size your image so that I can make a thermofax screen for you – here are some instructions. First the simple list. Then detailed instructions with pictures.
- SCAN your image (if you are working from a sketch.)
- CROP your image so there is no extra white space.
- SIZE your image so that it prints exactly the size you want.
- PRINT your image at 100% to test it out.
- NAME your image with your name, image name, the size YOU want the image printed at.
- SEND me your image via email after you have placed your order.
Now for detailed instructions.
With pictures and everything!
SCAN YOUR IMAGE
There are many ways to create imagery for thermofax screens – one of my favorite is simply doodling. This is an image from my sketchbook. In order to make this into a screen I first need to digitize it.

Scan of doodle cut out of sketchbook so it will lay flat.
You can see the difference in this image where the lighting is perfectly even and the photo is square. When you scan your image please pay attention to the following.
RESOLUTION: scan at 300 dpi because you are concerned with print quality – not screen quality. 72 is standard for an image that you look at on your screen but is not high enough for a clear crisp print.
FILE TYPE: JPG will be the easiest to work with in a digital editing project. If your piece needs no cropping and is already in black and white a PDF might do as well.
COMPRESSION: when you scan your image, then save it, make sure that you do not compress the file further. At some point when you go to save you will see a quality slider similar to the one below. Make sure you drag the slider all the way to 12 – which is the maximum quality.

If you don’t have a scanner you can work with a photo taken with whatever camera you have. In this case I took a photo with my iPhone.
It is very difficult to get even lighting. It is also hard to keep the image from keystoning, see how the image is distorted as it is in the upper left corner you see here. See THIS TUTORIAL for working with the image to make it thermofax-ready. This image is NOT ready because it is not a stark black and white.
Once you get it stark black and white like this… … you might need to further edit it. Say you drew your doodle on a 4″ x 6″ page but you actually want a 6″ x 8″ image? You will need to size it. These instructions will work with pretty much any digital editing program. I’ve used Photoshop Elements, Photoshop, Paint Shop Pro, and Gimp as well as a few others. If you can’t find the tools I mention in exactly the same place just open your program and type the tool name in the HELP box at the top. Most of the programs will give you an arrow pointing to where that tool is located.
now….
CROP YOUR IMAGE
See all that extra space around the image? In order for you to get exactly the size you want it will help you to get rid of all the extra. Look for the CROP tool… It usually looks like that little square I’ve pointed to on the left.
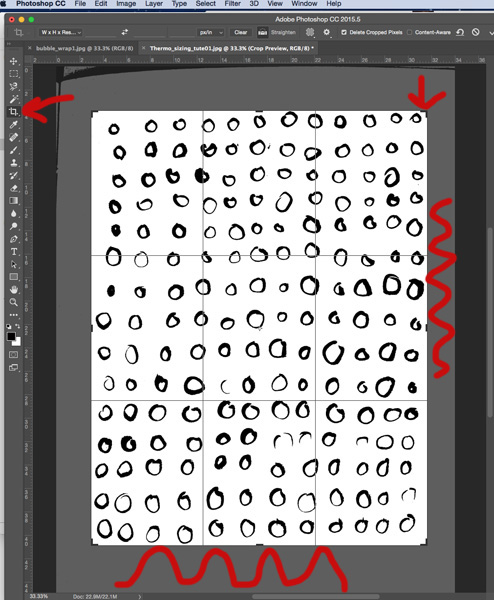 The crop tool will probably open a box over your image that you can then pull or drag along each corner to get rid of all the extra white.
Sometimes you just click and drag over the part of the image you want to keep then you can move the sides around to tuck them in all snug up against your image.
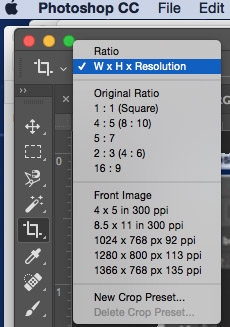
Sometimes the box will only stay square, or only keep the original ratio of the image file. In that case there should be a bar somewhere up at the top of the window that will let you change the preset ratio to “free”. Or in this case to W x H.
next…
SIZE YOUR IMAGE
With the extra cropped away you can size your image to exactly the size you would it to print. Find your program’s Image Size tool.

When you open the Image Size window you will see what width, height, and resolution your current image is. Make sure the number you are looking at is inches – not pixels or percent, or something else. There is a pull-down menu next to the number so you can change to inches if that is not what you see.

Notice that because I am using a photo from my iPhone rather than a scan my resolution is 72. That is how many tiny little squares of light the computer crams into an inch of the image you are seeing. Great for on-screen but if I am going to print this I want to change my number to 300 pixels per inch.  Now you can change the width and height to whichever size you prefer, so long as it fits within the guidelines for a small, medium, or large thermofax screen.
Small: max image size 3″ x 4″
Medium: max image size 4″ x 7″
Large: max image size 7″ x 9.5″
You can make your image smaller than 7″ x 9.5″ if you want it smaller on a large screen. You just can’t make it bigger than the maximum image size for each screen you order.
Why? Because even though the screen fabric you get for each size will be larger than the maximum image size you’ve got to leave enough blank space around the image on the screen so you can tape the edges or fit the mesh into a plastic frame.
next…
PRINT YOUR IMAGE
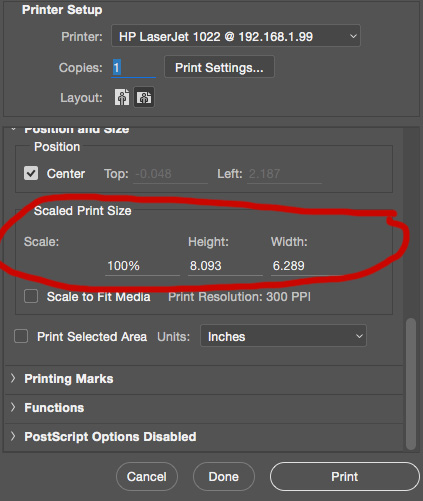
It’s always a good idea to print out your image to make sure it looks like you want it to. Make sure that however you print it – your print setting say your print size is 100%!

You might have to hunt – but make sure you are printing at 100%. In photoshop you have to scroll down quite a way to find the print scale.
Take a look at the printout. What you see in this printout (if it black and white with no gray) is what you are going to get on your screen. Is it fuzzy? Is it pixelated? Are there black splotches and specks? They will all show up on your screen.
You can learn how to clean up your image in THIS TUTORIAL.
Now that your image is exactly the right size and as clean as you can get it (unless of course you want it speckled and splotched – I’ve seen lovely messy screens that work quite well!)
NAME YOUR FILE
Label your file with your name, a description, and the exact size you want the image (not including the white area around it) to print at. It should be the same numbers you put into the image resize box up there!
example: Kinard_dotgrid_6.9×9.jpg
finally…
SEND YOUR FILES
Go to my CUSTOM THERMOFAX SCREEN page and order the size and number of custom screens you want me to make for you then send me an email with your images attached.
Good?
Any questions? Feel free to ask. If anything is unclear please let me know and I can try to tweak this tutorial for you.


3 Comments
Jodie Seila
April 2, 2018 at 9:49 pmLyric what kind of Thermal Fax sheets do you use and where do you buy it. Thank you.
Lyric Kinard
May 9, 2018 at 9:13 amI use the 70 mesh and order rolls from DYIprintsupply.com
Lyric Art — tutorial: doodle to thermofax ready image
September 26, 2016 at 7:07 am[…] strongly recommend you also check out my tutorial on SIZING so that when you send your image to me to be made into a thermofax screen you get exactly what you […]