For once I had enough presence of mind to take photos of my process as I worked. I thought I’d share with you my process for facing a quilt. I don’t often “bind” my works because most of my compositions would not benefit from that line enclosing the edges. A facing finishes your edges by turning them entirely to the back of the quilt.
Any quilt you are going to display on a wall also needs a hanging sleeve. I include mine as part of the facing.
Step 1: Block and square your quilt.
Step 2: Cut a sleeve one inch shorter than the width of your quilt and 9 or 10″ high. Press and sew a 1/4″ hem on both ends. Iron the sleeve in half the long way.
Step 3: adhere fusible web to one side of the folded sleeve.
Step 4: Pin or clip the sleeve to the top RIGHT SIDE of your quilt, fusible web facing up. Make sure to match the center of your sleeve to the center of your quilt.
Step 5: Cut two 4″ strips of fabric the length of your quilt and one the width of your quilt. I cut these strips on the length of the grain, it doesn’t stretch. Iron each strip in half the long way and adhere a strip of fusible web onto the top. Pin or clip strips to edges of your quilt, on the RIGHT SIDE, fusible facing up.
Step 6: Sew all the way around your quilt. I use about a 1/4″ seam. Back stitch and reinforce each corner.
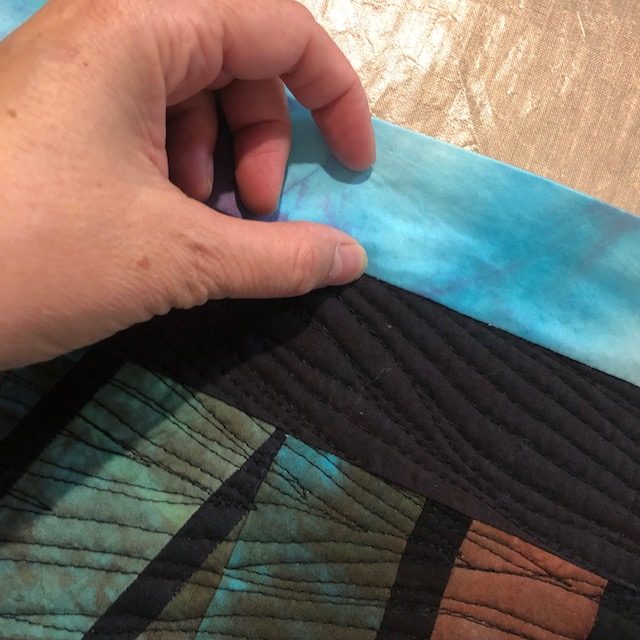
Step 7: Trim your corners very close. There is an extra step I forgot to implement on this quilt. Often I will sew the two sides strips first, press them and even edge stitch the seam allowance flat, then turn it to the back and press. I will then turn the side strips back – right sides together. The top sleeve tucks under the edges of the two side facing strips. I’ll cut the bottom facing strip one inch short and place it ON TOP of the side facing strips. That way when you turn it to the back the corners only have one strip worth of thickness. You get nice sharp corners that way.
Step 8: Finger press all facings and gently poke the corners as sharply as you can. If desired you can edge stitch the seam allowance to the facing to get it even flatter. You can’t really edge stitch into the corners unless you went through with the extra step I mentioned in 7. Peel paper of fusible web if you’ve used it.
Step 9: Beginning at the corners, iron fusible web so that the facing adheres to the quilt. Stretch and pull the quilt so that it retains it’s nice straight lines as you go.
Step 10: Steam and block your quilt once more. Depending on whether your quilt will get washed or how much abuse it will take, hand stitch the three narrow facings down, or not.
Step 11: Press up 1/4″ of the bottom of your sleeve. This will I’ve the sleeve just enough ease that a hanging slat won’t bulge to top of the quilt as much. Pull the top layer away and hand stitch at the fold. This is not optional as this is where a lot of the weight of the quilt will pull. I also stitch 1/2″ along the top of the quilt and sleeve, through all three layers. If it won’t show I do it by machine. If it will show I do it by hand, poking tiny stitches through all three layers. This keeps the sleeve from rising above the top of the quilt when it is hung.
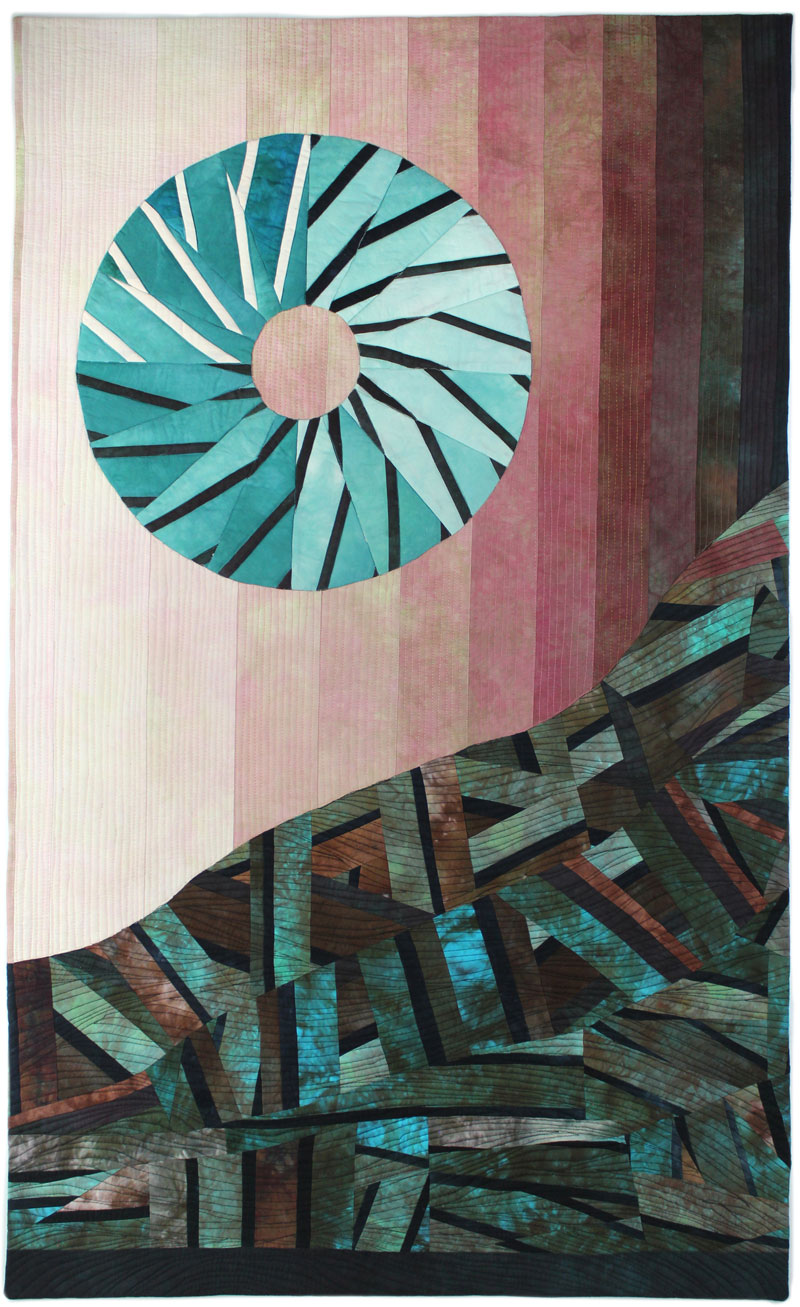
Mill Wheel: ebb
50″ X 30″
If you enjoy making smaller textile art pieces, and want a LOT of ideas for how to frame, mount, and present them in a professional way, you might enjoy my on-demand workshop: Picture It Framed.
It’s ironed into the back side of the facing, which then fuses it to the back side of the quilt. If you wait to adhere the fusible web to the facing until after it is sewn on, as shown in the photo, then you don’t have to worry about front/back of the actual fabric.
I go to the hardware store and use very simple wooden molding, thin on the bottom and slightly rounded at the top. I cut it an inch less wide than the quilt, sand it, seal it, and insert two eye screws in the fat end. Use skinny but larger-eye screws so they fit over gallery hooks if you work with fine art exhibit venues.
Less than $10 per hanging slat.
So the top facing is actually the hanging sleeve? I’m just making sure I got it. I am trying to do a facing and a sleeve and you are the only one who has instructions for how to do both at once.
Thanks. (A YouTube would be terrific! Or if it is part of one of your classes, let me know.)


8 Comments
Sue
April 29, 2024 at 10:04 amI have one question: Are you ironing the fusible web to the RIGHT side of the fabric or to the WRONG side of the fabric?
Lyric Kinard
April 29, 2024 at 10:39 amIt’s ironed into the back side of the facing, which then fuses it to the back side of the quilt. If you wait to adhere the fusible web to the facing until after it is sewn on, as shown in the photo, then you don’t have to worry about front/back of the actual fabric.
Daren
April 7, 2024 at 10:58 pmThe Hang Ups Company charges $96 for shipping for their C bars. do you know of another company that makes these,>
Lyric Kinard
April 8, 2024 at 9:54 amI go to the hardware store and use very simple wooden molding, thin on the bottom and slightly rounded at the top. I cut it an inch less wide than the quilt, sand it, seal it, and insert two eye screws in the fat end. Use skinny but larger-eye screws so they fit over gallery hooks if you work with fine art exhibit venues.
Less than $10 per hanging slat.
Nancy
September 2, 2022 at 1:52 pmSo the top facing is actually the hanging sleeve? I’m just making sure I got it. I am trying to do a facing and a sleeve and you are the only one who has instructions for how to do both at once.
Thanks. (A YouTube would be terrific! Or if it is part of one of your classes, let me know.)
Donna Dowdney
April 25, 2022 at 3:01 pmHi Lyric,
How do I access the Picture It Framed workshop? Do you have other similar workshops?
— Donna
Abbey
August 24, 2019 at 12:28 amSo very beautiful! Abbey
Glorianne
August 14, 2019 at 7:39 pmAWESOME Lyric! Thank you for such a great tutorial. Your quilt is outstanding! Mahalo and Aloha! Glorianne Volcano, Hawaii